


Editor’s Note: I’m so very excited to introduce a dear friend and kick-ass designer as our guest for today’s Crafty Girl. Arrs is the mad scientist behind GemKitty, a fantastic website that basically allows you to staff out your DIY jewelry fantasies. Pick one of their dozens of beautiful designs, come up with a color combo you love, and presto – they’ll ship it to your door in no time flat.
Oh, and the best news? Order today (it’s the last day for Valentine’s Day orders), and get 30% off with code ROMEO – forward it to a significant other or take matters into your own hands!
In the meantime, Arrs has cooked up an exclusive DIY design for your Valentine’s Day delight. I can hardly wait to get started on this pretty – if only I could decide on a color combo. Lapis beads with bright yellow jasper accents? Pale green aventurine and orange carnelian? Where would you start? (Yep, I totally used her amazing website as a gem cheat sheet for that, by the way.)
~~~~~~~~~~~~~~~~~~~~~~~~~~~~~~~~~~~~~~~~~~~
DIY fashion is all the rage (again) and while I heart marathon crafting sessions, I presume most of you aren’t reading this with hot glue gun, plumbing parts, and yards of fancy ribbon in hand.
So, for you crafty novices, I’ve cooked up a DIY necklace project that is the perfect way to wish yourself a happy Valentine’s Day. It’s simple (no special tools required), can easily be made while imbibing your favorite cocktail or gossiping with your girlfriends, and absolutely everyone can pull it off with style.

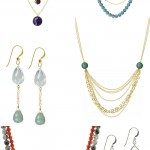
Necklace made with tiger’s eye and carnelian beans and suede cord.
To make your very own, just click below for all the gory details:
You’ll need:
- Beads! Whatever catches your fancy. (Shopping tips at the end)
- Ribbon or cord – at least 18 inches, but just about any durable, flexible style will do.
- 2 closed jumprings – These are connectors used in jewelry making. Traditionally they’re circular, but really any shape will do as long as your ribbon/cord can fit through it. Note – make sure they’re closed jumprings. The open kind can be pulled apart and are a no-go here.
- Beading wire (stronger) or needle and thread (more easily accessible). Double or even quadruple layer the thread for strength. You’ll need a total length equal to the length you want your necklace to end up, plus about 12″ for easy knotting at the ends.
- Scissors for snipping ends.
- Krazy glue or Mod Podge.
- Needle nose pliers (only if you’re using beading wire). Your basic toolbox pliers are fine here, no fancy jewelry equipment needed.
To create a basic necklace, string your beads onto the beading wire, in whatever combination strikes your fancy. Then, thread one end of the beading wire through one of your jump rings and tie, using a double knot. Snip the loose end for neatness, and use pliers to help tighten your knots if you’re using beading wire.
Repeat on the other side. This will be a little trickier, since you need to check there is just the right amount of slack (not enough and you’ll have a gap, too much and your beads can look jammed & gnarled). I usually use the end of the pliers as a guide – leave just enough slack that you can grasp the space between the beads and the ring with the pliers.
All done? Now, carefully dot a teeny bit of glue or Mod Podge onto your knots for extra security. (Avoid getting glue on your beads – it impairs the pretty). Then, add your cord or ribbon to finish. Just thread one end through both rings, bring it up and tie a bow, leaving 3-6 inches of length for the cord to rest along the back of your neck. Snip the ends of the ribbon neatly…et voila!
If you love it, this template is super easy to customize. Attach another strand (or two) to those jump rings to create a statement piece, make it longer, or shorten it to a choker (you should be able to play around with the length a bit regardless, thanks to that handy dandy ribbon closure. Experiment away, friends!
Bead Shopping Tips and Tricks:
So, where should I go to load up on beads? I’m usually a total bead snob, but I think Michael’s is a a good starter for a newbie. It’s really affordable (especially if you nab the 40% off coupon in the paper – it’s there nearly every week), and you can touch and feel a range of beads, shapes, and sizes. They do stock semi-precious gemstones (my fave), but the quality can be pretty mediocre.
Pfft, I want quality! My favorite spot to buy beads online is Beadsonsale.com. They’re not the sexiest of stores, but you’ll get a good bang (and sparkle) for your buck here. And yes, they take returns. The only down side is that most items are sold in 16 inch strands; however their prices are reasonable, so I think it’s worth it even if you just wanted to use half the strand.
Hmm, how do I know how large these beads on screen are in real life? It is indeed tricky. Bead sizes are determined by diameter in mm (go metric system!) But, never fear! Print this PDF to see some standard bead sizes.
Great, but how do I pick complimentary bead combos? Mixing, matching, and experimenting is the fun part, m’dear!
- Color combo tips: Jewelry can be a low-risk way to try the latest seasonal color trends. I couldn’t get myself to buy all pink/red outfit earlier this year, but I rocked a pink and red pair of earrings. And if all else fails, you can never go wrong with a vibrant primary color paired with a neutral (my current fave is navy + turquoise).
- Bead shape/size tips: Don’t be afraid to match contrasting shapes and sizes for a more modern look. However, take care with certain shapes that don’t sit flush next to each other (e.g. a teardrop bead next to a round bead), otherwise you could end up with exposed beading wire. Not pretty.
More Q’s? Post in the comments!
xo,
Arrs


Pingback: crafty girl: be your own valentine » shoppingsmycardio | Fashion World for She