Category Archives: DIY

instant update: the easiest denim DIY ever

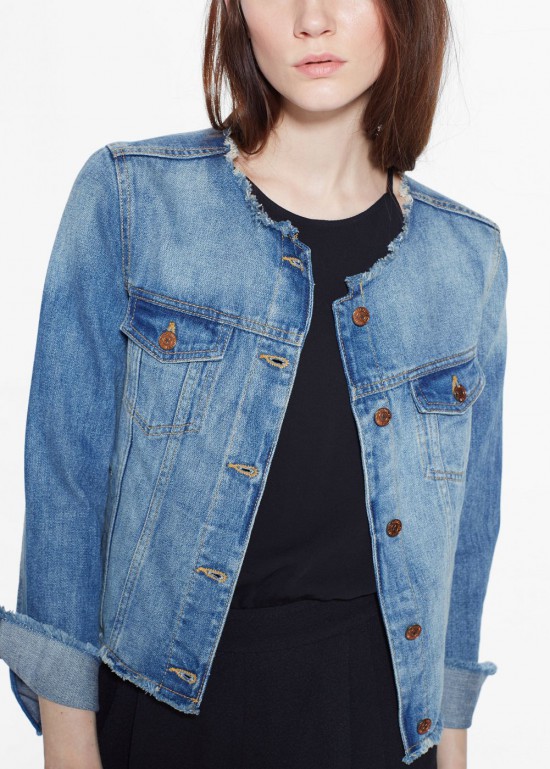
frayed denim jacket

| Buy it at Mango, or handle this easy denim DIY with a pair of shears and a deft hand |

I don’t know about you, but this little number has me dying to take a pair of scissors to my favorite denim jacket.

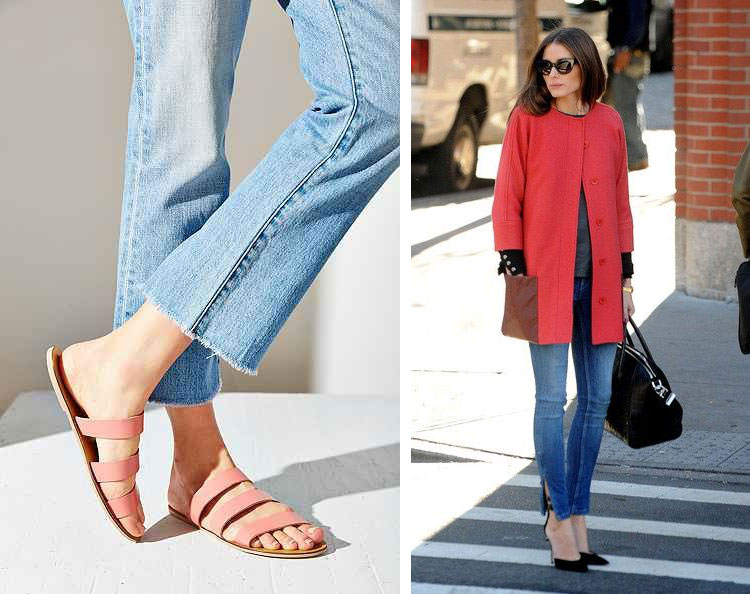
In fact, the internet seems hellbent on my taking shears to just about all of the denim in my closet. I could unpick the hems of some tired old straight-leg jeans…

raw-hem-denim

Or just lop the bottoms off a pair of washed-up skinnies…

diy-raw-hem-denim

What I particularly love about this of-the-moment trend is that it’s virtually consequence-free. Hate it? You were probably ready to part with those jeans anyway, or you wouldn’t have been willing to chop them up in the first place. So either it’s a genius reinvention or a cosmic justification for a quick closet purge.

So, what do you think? Ready to bust out the sewing scissors this summer?

 |  All images via my Pinterest page…but yes, I’m still pissed at them. |


Share 'instant update: the easiest denim DIY ever' on Facebook Share 'instant update: the easiest denim DIY ever' on Google+ Share 'instant update: the easiest denim DIY ever' on Pinterest Share 'instant update: the easiest denim DIY ever' on Twitter Share 'instant update: the easiest denim DIY ever' on Email

friday finds: summer projects

Happy Friday, friends! Well, it’s happened: we’ve come to that time in the summer when the days are long, and my ambition is high. I have so many summer projects brewing in my tired little brain, it will be a real miracle if I can settle down long enough to make one or two of them happen. Specifically? I’m so glad you asked. Read on

Share 'friday finds: summer projects' on Facebook Share 'friday finds: summer projects' on Google+ Share 'friday finds: summer projects' on Pinterest Share 'friday finds: summer projects' on Twitter Share 'friday finds: summer projects' on Email

a little inspiration, and your very own printable!

Not long ago, I was doing my best to catch up on my RSS feed (all 900+ articles, thank you), and something Garance Doré had to say stopped me in my tracks. She was talking about her plans for the new year – resolutions and such – and somewhere in the midst of a ramble I couldn’t totally make sense of, she repeated something a professor of hers had once told her:

Read on

Share 'a little inspiration, and your very own printable!' on Facebook Share 'a little inspiration, and your very own printable!' on Google+ Share 'a little inspiration, and your very own printable!' on Pinterest Share 'a little inspiration, and your very own printable!' on Twitter Share 'a little inspiration, and your very own printable!' on Email

asked and answered: stylish shoe storage

Friends, one of you sent me this question back in January, and I am incredibly tardy in responding. But in my defense, it wasn’t that I forgot, or that I had more important things to do. No, it’s that it was a genuinely tricky query, and I needed some time to marinate on the best options.

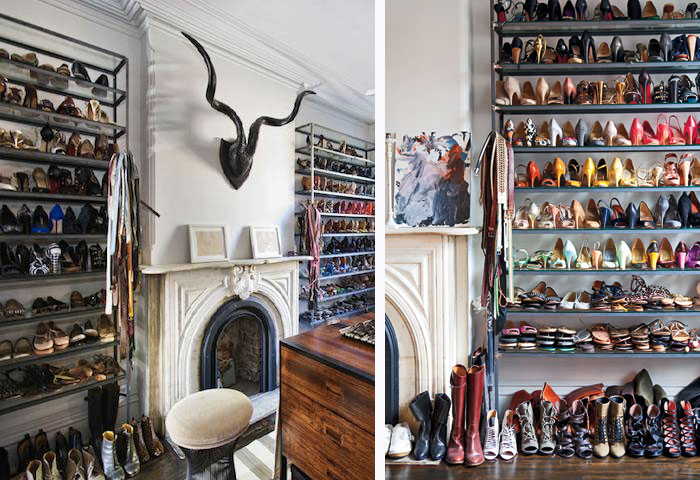
The attached photos you may recognize as Jenna Lyons’ closet.  I love the shelving she uses to store her shoes and would like to recreate it in my own closet but I don’t want to spend a fortune. I’ve tried to find some shelving that looks nice…..not so industrial but no such luck. Any suggestions?  ~Jaime R.

{Photos c/o Trulia}

See what I mean? Jaime wants me to do better on a closet storage option than Jenna Lyons? Talk about a tall order. And so, I just sort of pushed her question to the back of my mind, where it’s been rolling around aimlessly for the last month (or two).

But, I think I finally have a suggestion that will work brilliantly. Those shelves you see in Jenna’s closet are actually glass, with powder-coated metal framing. I’m guessing it’s the frame you’re not crazy about – and, to be honest, I’m guessing those shelves are commercial display models, so you don’t have to worry. You’d never be able to find them anyway.

I trolled all sorts of home design stores looking for solutions, but I think they’ll all still have that industrial bent you don’t love. Then it hit me, like a bolt from the blue: floating shelves are what you need. Glass would be the closest to Jenna’s look, but I think it depends on the space and your personal preferences. A few parameters:

  • The shelves need to be at least 10″ deep; 12″ if you wear anything larger than a size 9 shoe. Just remember, the deeper you go, the more cautious you have to be about installing – they’re at a higher risk of ripping out of the wall if you apply too much weight.
  • Most glass shelves aren’t very long, so you may need two per row to fill a space. You’ll have more length options if you go for a non-glass option, so it just depends on the look you’re after.
  • Please, please make sure you enlist some help when hanging these. They need to be anchored in a stud to support your shoes, and that’s not something you want to DIY unless you’re experienced.

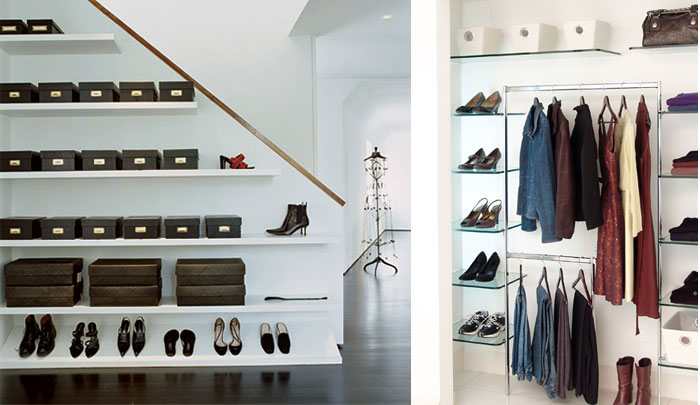
If you play your cards right, you should end up with something that looks a bit like this:

{Images c/o Architectural Digest / FloatingGlassShelves.com}

As for sources, your best bet for glass (after an exhaustive search) is Home Depot – they have every shape and size you could ever wish for. If you’re after a non-glass option, IKEA has dozens of choices in everything from wood to laminate to metal, and it’s hard to argue with their prices.

If you don’t love this option, I heartily recommend the current issue of Lucky, which includes a fantastic how-to section on closet storage ideas (including some great shoe storage options). It’s definitely worth a look before you make any decisions.

One last tip: Jenna has her shelves incredibly overloaded…which makes me both envious and stressed out. Leave some space between your shoes, and you’ll have a much cleaner look.

Good luck, Jaime! I expect an update when this project of yours is completed.

Have a fashion, beauty or design question that’s leaving you stumped? Send it my way, and I’ll do my best to sleuth out a solution. editor {at} shoppingsmycardio {dot} com

Share 'asked and answered: stylish shoe storage' on Facebook Share 'asked and answered: stylish shoe storage' on Google+ Share 'asked and answered: stylish shoe storage' on Pinterest Share 'asked and answered: stylish shoe storage' on Twitter Share 'asked and answered: stylish shoe storage' on Email

crafty girl: be your own valentine

Editor’s Note: I’m so very excited to introduce a dear friend and kick-ass designer as our guest for today’s Crafty Girl. Arrs is the mad scientist behind GemKitty, a fantastic website that basically allows you to staff out your DIY jewelry fantasies. Pick one of their dozens of beautiful designs, come up with a color combo you love, and presto – they’ll ship it to your door in no time flat.

Oh, and the best news? Order today (it’s the last day for Valentine’s Day orders), and get 30% off with code ROMEO –  forward it to a significant other or take matters into your own hands!

In the meantime, Arrs has cooked up an exclusive DIY design for your Valentine’s Day delight. I can hardly wait to get started on this pretty – if only I could decide on a color combo. Lapis beads with bright yellow jasper accents? Pale green aventurine and orange carnelian? Where would you start? (Yep, I totally used her amazing website as a gem cheat sheet for that, by the way.)

~~~~~~~~~~~~~~~~~~~~~~~~~~~~~~~~~~~~~~~~~~~

DIY fashion is all the rage (again) and while I heart marathon crafting sessions, I presume most of you aren’t reading this with hot glue gun, plumbing parts, and yards of fancy ribbon in hand.

So, for you crafty novices, I’ve cooked up a DIY necklace project that is the perfect way to wish yourself a happy Valentine’s Day. It’s simple (no special tools required), can easily be made while imbibing your favorite cocktail or gossiping with your girlfriends, and absolutely everyone can pull it off with style.

Necklace made with tiger’s eye and carnelian beans and suede cord.

To make your very own, just click below for all the gory details:

Read on

Share 'crafty girl: be your own valentine' on Facebook Share 'crafty girl: be your own valentine' on Google+ Share 'crafty girl: be your own valentine' on Pinterest Share 'crafty girl: be your own valentine' on Twitter Share 'crafty girl: be your own valentine' on Email

ahead of my time

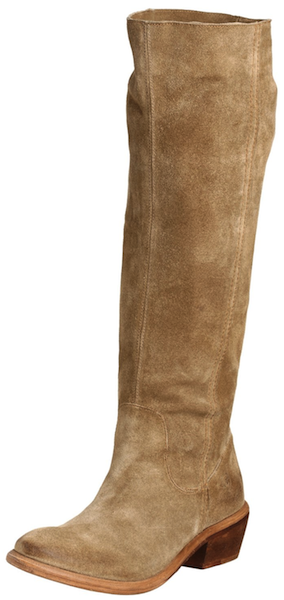
Remember those slouchy suede boots I had shortened last month?

Imagine my giddy surprise to see the following in Isabel Marant’s Spring 2012 collection:

It’s an utter fluke when style coincidences like these come along, so I couldn’t resist sharing. I like to think it gives hope to the rest of us when someone who isn’t Alexa Chung (ahem…) gets a big ol’ high five from the fashion world, entirely by accident. And thank goodness, as I know I’d have been coveting these babies something fierce. Now, if the craving strikes, you’ll know just how to get the look for a fraction of the cost.

Share 'ahead of my time' on Facebook Share 'ahead of my time' on Google+ Share 'ahead of my time' on Pinterest Share 'ahead of my time' on Twitter Share 'ahead of my time' on Email

crafty girl: the isabel marant boot hack

This is really crafting by delegation (which, one might argue, is the best kind of crafting), but I had to share my most recent “Well, aren’t you clever?” moment.

A couple of years ago (wow, make that three years ago!), I bought a pair of cheap tall suede boots. They were my first foray into the world of tall boots, actually – I’d never been a fan, being from California, where shoe-related warmth is utterly unnecessary. You can see the process unfold right over here if you’d like a stroll down memory lane.

As you’d expect from cheap boots with absolutely no internal structure, these turned from slouchy chic to saggy swashbuckler over the course of a couple of years. They showed all sorts of unpleasant watermarks and wear on the shaft, the color was fading, and – best of all – the stitching was coming out at the top. Clearly, something had to be done.

Meanwhile, I was wishing for a great pair of knock-around cognac ankle boots to give my beloved Rachel Comeys a break (and stand in for the $800 Isabel Marant boots I’d been coveting). It finally dawned on me, in a fit of genius, that I have an amazing cobbler and a fashion gambler’s heart (Ha! As if.). So, I took them to my beloved cobbler Dorian, who turned these:

…into these:

And I’ve been wearing them almost nonstop since. Brand new shoes for $35 – not bad!

My crafty hack would work best with a cheapie pair of boots (lining and zippers will definitely complicate things. But if you have a far-too-slouchy pair of boots in your closet that you just can’t salvage, this is a pretty fantastic solution. Just remember, a good cobbler is key to this crafty mission. If you don’t have one, you’re missing one of the great joys in life. If you don’t have one in your town, ask the most well-heeled girl you know who she trusts.

Share 'crafty girl: the isabel marant boot hack' on Facebook Share 'crafty girl: the isabel marant boot hack' on Google+ Share 'crafty girl: the isabel marant boot hack' on Pinterest Share 'crafty girl: the isabel marant boot hack' on Twitter Share 'crafty girl: the isabel marant boot hack' on Email

the how-to: conquering a tiny closet

Today’s guest is Melissa Tomeoni, whom you all know as the highly-talented photographer behind my portraits. Besides those traditional gigs, Melissa is a crazy-good fine art photographer (check out her latest series on Etsy!). And she’s also one of the most fun DIY girls I’ve ever known. When she told me about her latest project – turning her miniscule closets into a bedroom-sized boutique, I had to see it for myself. It’s genius!

~~~~~~~~~~~~~~~~~~~~~~~~~~~~~~~~~~~~~~~~~~~~~~~~~

There is something you should know about me: I have a few pet peeves. Everyone has them, but mine are special in that they all have to do with problems I create for myself.

1.  Being disorganized. Can’t stand it. Can’t sleep because of it. Furthermore, it leads to other fun things like a claustrophobic nature. (I’m sure you are all just dying to be my friend now, right?)

2. Buying crap to store my clothes/dishes/accessories/etc. Honestly, I would rather spend my money on fun items then containers to put my fun items in. Alas, I refer to #1 and find myself in an internal struggle.

3.  People who contradict themselves. So essentially, I’m my own pet peeve.

About four weeks ago my husband, puppy and I moved into a new place. While the square footage is about the same, it seems as though we’ve lost 15 closets in the move – including our separate bedroom closets. So, my husband and I are once again sharing a closet. Agony! Since I know many couples deal with this tragedy, I hope to help a few of you by sharing my solutions. The goal was to make my closet look acceptable, function well and, of course, store the wardrobe that I love so dearly.

The solution, sadly, was to put aside pet peeve #2 and buy some crap to store my crap. And so, I dragged myself to the two best places in the home improvement world: Ikea and Bed Bath and Beyond.

Solution #1. Buy slim line hangers (including these fancy pant hangers) from Real Simple. These little puppies are fuzzy so they grip even the slimmest spaghetti strap or widest scoopneck blouse. The bigger bonus is the stackability factor – each hanger has a little hook that allows you to hang a second hanger from it, so you can hang pieces up to to 4x deep. Perfecto! I was kind and bought enough for both me and my husband.

Solution #2. Install more spaces to store coats and shoes. In a small space, the worst thing you could do would be to buy more bulky furniture to eat up your square footage. I knew I wanted my shoes (and coats) off the floor and something had to be done. While at Ikea I found simple unfinished shelves, and brackets to hang them. Rather then purchasing an official wardrobe, I decided my things looked good enough to be displayed. So, I essentially “merchandised” my clothes right into my bedroom’s decor!
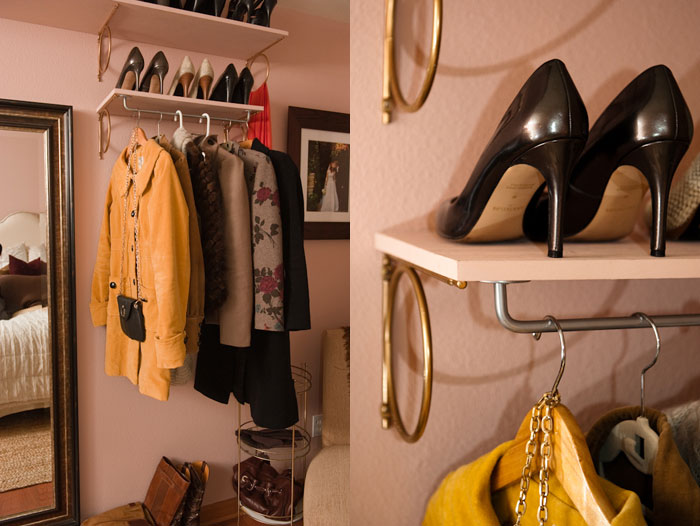
I used leftover wall paint and painted the shelves to match our existing wall color, creating a neutral backdrop that lets the colors and shapes of the clothes take the stage. I chose brackets that resemble the circular pattern on my dresser and spray painted them gold to match. I bought 2 silver hanging racks (found in the kitchen section of Ikea) to mount upside down to hang my coats on. The final step is installation. Ta-da! My very own sleep-in closet.
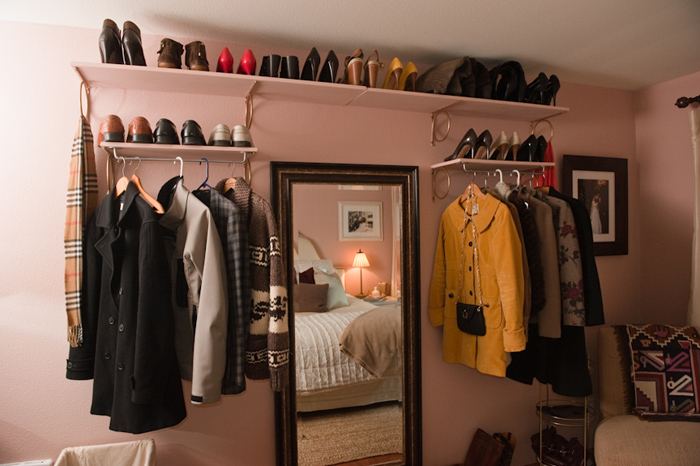
It’s been about 2 weeks since my closet had it’s makeover, and I can honestly say my life is so much happier now, with all of my pet peeves at bay. It feels a little like living in a boutique I can borrow from any time I want. I can see all of my fall/winter coats, my shoes, and my sweaters, so I actually get to wear everything I’ve worked so hard to own. As it turns out, maybe my pet peeves are more motivation than annoyance. –Melissa Tomeoni

Share 'the how-to: conquering a tiny closet' on Facebook Share 'the how-to: conquering a tiny closet' on Google+ Share 'the how-to: conquering a tiny closet' on Pinterest Share 'the how-to: conquering a tiny closet' on Twitter Share 'the how-to: conquering a tiny closet' on Email